In the ever-evolving landscape of mobile technology, eSIMs—short for embedded SIMs—are rapidly gaining popularity. Unlike traditional SIM cards, which are physical pieces of plastic you insert into your phone, eSIMs are digital and embedded directly into the device's hardware. This small but mighty innovation allows users to activate a cellular plan without needing to fiddle with tiny SIM card trays or visit a store to pick up a new card. With eSIM, everything is managed through software, providing a seamless experience.
The primary advantage of eSIM technology is its flexibility. Users can switch between different carriers or plans without the hassle of swapping out physical cards. This is particularly beneficial for frequent travelers who can easily switch to a local carrier's plan when abroad. Moreover, because eSIMs support multiple profiles, users can have several numbers and plans on a single device, making it easier to separate work and personal communications.
Despite these advantages, the concept of eSIMs may still be new to many users. Understanding how this technology works is crucial for making the most of its capabilities. The eSIM is activated by scanning a QR code provided by your carrier, which then downloads the necessary data to your device. Once activated, the eSIM functions just like a traditional SIM, allowing you to make calls, send texts, and use data. This guide will walk you through the process of transferring your eSIM between iPhones, ensuring you can take full advantage of this innovative technology.
When upgrading to a new iPhone, transferring your eSIM ensures continuity of service without any downtime. Unlike physical SIMs, which can be removed and inserted into a new device in seconds, eSIMs require a bit more effort. However, the process is straightforward and can be completed fairly quickly if you follow the right steps. Transferring your eSIM allows you to retain your existing phone number and carrier plan, eliminating the need to set up everything from scratch.
Another reason you might want to transfer your eSIM is convenience. If you have multiple eSIM profiles set up for different purposes—such as personal use, work, or international travel—transferring them to your new iPhone means you won’t have to reconfigure each profile. This can save you a significant amount of time and ensure that your new device is ready to use as soon as possible.
Lastly, transferring your eSIM can be a cost-effective option. Many carriers charge for issuing new physical SIM cards, but transferring an eSIM is usually free. Additionally, some carriers offer exclusive eSIM plans that are more affordable or come with better features compared to traditional SIM plans. By transferring your eSIM, you can continue to take advantage of these benefits without interruption.
Before you begin the transfer process, it’s crucial to ensure you have everything you need. First and foremost, you'll need both your old and new iPhones. Make sure both devices are fully charged to avoid any interruptions during the transfer process. Additionally, both iPhones should be connected to a stable Wi-Fi network, as you'll need internet access to download the eSIM profile onto your new device.
Next, make sure that your old iPhone's iOS is up to date. The transfer process may require certain features that are only available in the latest iOS versions. Similarly, ensure that your new iPhone is also running the latest version of iOS. If either device needs updating, take the time to do this before proceeding with the transfer.
You'll also need your carrier's eSIM QR code or activation details. This information is usually provided when you first set up your eSIM, either in an email or through your carrier's app. If you can't find this information, contact your carrier to obtain a new QR code or activation details. Having this information on hand will make the transfer process much smoother and quicker.
Preparing your old iPhone for eSIM transfer involves a few essential steps to ensure the process goes smoothly. Start by backing up your old iPhone. You can do this using iCloud or iTunes on your computer. A full backup ensures that all your data, including your eSIM profiles, are safely stored and can be restored on your new device if needed. This step is crucial as it acts as a safety net in case anything goes wrong during the transfer.
Next, go to the Settings app on your old iPhone and navigate to the Cellular or Mobile Data section. Locate your eSIM profile and make a note of any important details such as the carrier name and plan information. This can be helpful if you need to enter any information manually during the transfer process. Some carriers also allow you to deactivate the eSIM on your old device, which can make the transfer process easier. Check with your carrier for specific instructions.
Finally, sign out of your Apple ID on your old iPhone. This step is often overlooked but is important to ensure a smooth transition to your new device. Go to the Settings app, tap on your name at the top, and scroll down to find the Sign Out option. This will deactivate services like Find My iPhone, which can interfere with the eSIM transfer process. Once you've signed out, you can proceed to set up your new iPhone.
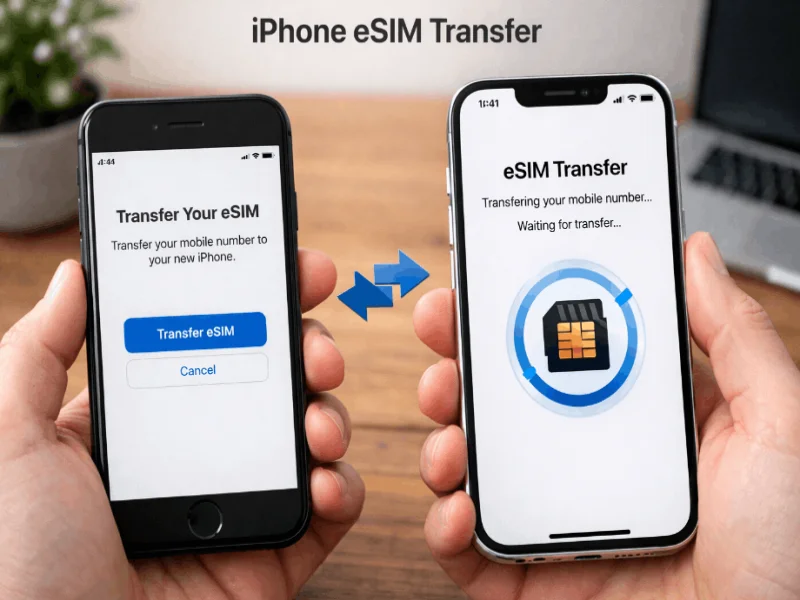
Transferring your eSIM to your new iPhone involves several steps, but following them carefully will ensure a smooth transition. Start by turning on your new iPhone and following the on-screen instructions to set it up. When you reach the screen that asks if you want to transfer data from another iPhone, choose the option to transfer from an old device. This will initiate the Quick Start process, which can transfer all your data, including your eSIM profiles, to your new iPhone.
During the Quick Start process, you'll be prompted to connect both iPhones to the same Wi-Fi network and hold them close together. Follow the on-screen instructions to authenticate the transfer using Face ID or Touch ID. Once the initial setup is complete, your new iPhone will start downloading your data from your old device, including your eSIM profile. This process can take some time, depending on the amount of data being transferred.
After the data transfer is complete, you may need to activate your eSIM on the new iPhone. Go to the Settings app, navigate to Cellular or Mobile Data, and look for an option to add a new eSIM or activate a cellular plan. Scan the QR code provided by your carrier or enter the activation details manually. Follow the on-screen instructions to complete the activation process. Once activated, your eSIM should be fully functional on your new iPhone, allowing you to make calls, send texts, and use data as usual.
Despite your best efforts, you may encounter some issues while transferring your eSIM. One common problem is the eSIM profile not activating on the new iPhone. If you face this issue, double-check that both iPhones are connected to the internet and running the latest iOS version. Restart both devices and try the transfer process again. If the problem persists, contact your carrier for assistance, as they may need to reset your eSIM activation.
Another issue you might encounter is the eSIM profile not appearing on your new iPhone after the data transfer. This can happen if the eSIM profile was not included in the backup or if there was an error during the transfer. To resolve this, go to the Settings app on your new iPhone, navigate to Cellular or Mobile Data, and manually add the eSIM profile using the QR code or activation details from your carrier. This should restore your eSIM profile and get it working on your new device.
Lastly, you might experience connectivity issues after transferring your eSIM. This can manifest as dropped calls, slow data speeds, or an inability to send texts. To troubleshoot these issues, ensure that your eSIM profile is properly activated and that your carrier settings are up to date. You can check for carrier settings updates by going to the Settings app, navigating to General, and selecting About. If an update is available, follow the on-screen instructions to install it. If these steps don't resolve the issue, contact your carrier for further assistance.
Once you've completed the transfer process, it's essential to verify that your eSIM is activated and working correctly on your new iPhone. Start by opening the Settings app and navigating to the Cellular or Mobile Data section. Here, you should see your eSIM profile listed along with any other cellular plans on your device. If your eSIM profile is not listed, try adding it manually using the QR code or activation details from your carrier.
Next, test your eSIM by making a phone call, sending a text message, and using mobile data. This will help you confirm that all aspects of your eSIM are functioning as expected. If you encounter any issues, double-check that your eSIM profile is properly activated and that your carrier settings are up to date. You can also try restarting your iPhone, as this can sometimes resolve minor connectivity issues.
Finally, it's a good idea to check your carrier's app or website to ensure that your account is properly linked to your new iPhone. This can help you avoid any billing issues or service disruptions. If everything appears to be in order, you can confidently start using your new iPhone with your transferred eSIM. This verification step is crucial for ensuring a smooth transition and uninterrupted service.
Managing multiple eSIM profiles on your iPhone can be incredibly convenient, especially if you need to separate work and personal numbers or frequently travel internationally. To get started, go to the Settings app and navigate to the Cellular or Mobile Data section. Here, you can add new eSIM profiles by scanning the QR codes provided by your carriers or entering the activation details manually. Once added, you can switch between profiles as needed.
One useful feature of iPhones with eSIM support is the ability to label each profile. This makes it easy to distinguish between different numbers and plans. To label a profile, go to the Cellular or Mobile Data section in the Settings app, tap on the eSIM profile you want to label, and select a label from the list or create a custom one. This can help you quickly identify which profile to use for different purposes, such as work, personal use, or international travel.
Another tip for managing multiple eSIM profiles is to customize your notification settings for each profile. This allows you to control how and when you receive notifications for calls, texts, and data usage. For example, you might want to disable notifications for your work profile outside of business hours or set data usage limits for an international travel profile. By customizing these settings, you can ensure that each eSIM profile meets your specific needs and preferences.
When it comes to choosing between eSIM and physical SIM cards, both options have their pros and cons. eSIM technology offers greater flexibility and convenience, allowing users to switch between carriers and plans without needing to swap out physical cards. This can be particularly beneficial for frequent travelers or individuals who need to manage multiple phone numbers. Additionally, eSIMs are more secure than physical SIM cards, as they cannot be easily removed or tampered with.
On the other hand, physical SIM cards have been around for much longer and are supported by virtually all carriers and devices. This makes them a more universally compatible option. Physical SIMs are also easier to use for those who are not tech-savvy, as they do not require scanning QR codes or dealing with software-based activation processes. In some cases, physical SIMs may also offer better compatibility with older devices that do not support eSIM technology.
Ultimately, the choice between eSIM and physical SIM depends on your specific needs and preferences. If you value flexibility, convenience, and security, eSIM is likely the better option. However, if you prefer a more straightforward and universally compatible solution, a physical SIM may be the way to go. Both options have their place in the world of mobile technology, and understanding their differences can help you make an informed decision.
Transferring your eSIM between iPhones may seem daunting at first, but with the right preparation and guidance, the process can be quick and straightforward. Understanding eSIM technology and its benefits is the first step in making the most of this innovative feature. By following the step-by-step guide provided in this article, you can ensure a smooth transfer and enjoy uninterrupted service on your new iPhone.
From preparing your old iPhone to troubleshooting common issues and managing multiple eSIM profiles, each step is crucial for a successful transfer. Verifying eSIM activation on your new device ensures that everything is working correctly, giving you peace of mind. Additionally, understanding the advantages and drawbacks of eSIM versus physical SIM can help you make informed decisions about your mobile plan and device setup.
In conclusion, eSIM technology offers a modern, flexible, and secure alternative to traditional SIM cards. Whether you're upgrading to a new iPhone or simply looking to manage multiple profiles more efficiently, eSIM provides a range of benefits that can enhance your mobile experience. By following this comprehensive guide, you can transfer your eSIM with confidence and enjoy all the advantages that this cutting-edge technology has to offer.


Comments